Why Summer Preparation Starts in Spring
The secret to a thriving summer garden is what you do in May and June. For pleached trees in particular, the work you put in now — improving soil, getting spacing right, and establishing a watering routine — will determine how well your trees perform through the warmer months ahead.
This guide walks you through everything you need to do to get your garden summer-ready, with a focus on pleached trees as the backbone of a beautiful, structured outdoor space.
Step 1: Assess and Improve Your Soil
Before planting or feeding, it's worth understanding what you're working with. UK soils vary enormously — from heavy clay in the Midlands to free-draining sandy soils in the South East.
- Clay soils – Improve drainage by incorporating horticultural grit and well-rotted compost. Pleached trees can struggle in waterlogged clay, so raised planting or mounding can help.
- Sandy soils – Add plenty of organic matter to improve moisture retention. Sandy soils dry out quickly in summer, so mulching is essential.
- Loamy soils – The ideal for most pleached trees. Top up with compost and a balanced fertiliser ahead of the growing season.
Aim for a soil pH of 6.0–7.0 for most pleached tree varieties. A simple soil test kit (available from garden centres) will tell you where you stand.
Step 2: Get Your Spacing Right
Correct spacing is one of the most important factors for a healthy pleached screen. Too close and trees compete for light and nutrients; too far apart and you lose the privacy effect.
- Hornbeam and Novita Laurel – 1.5–2m apart for a dense screen
- Portuguese Laurel – 1.5–2m apart; evergreen so provides year-round coverage
- Sweetgum – 2–2.5m apart to allow for its broader canopy
- Red Robin – 1.5–2m apart; the vibrant red new growth is best appreciated with a little space between trees
If you're planting a new row this spring, mark out your spacing with canes before digging to make sure you're happy with the layout.
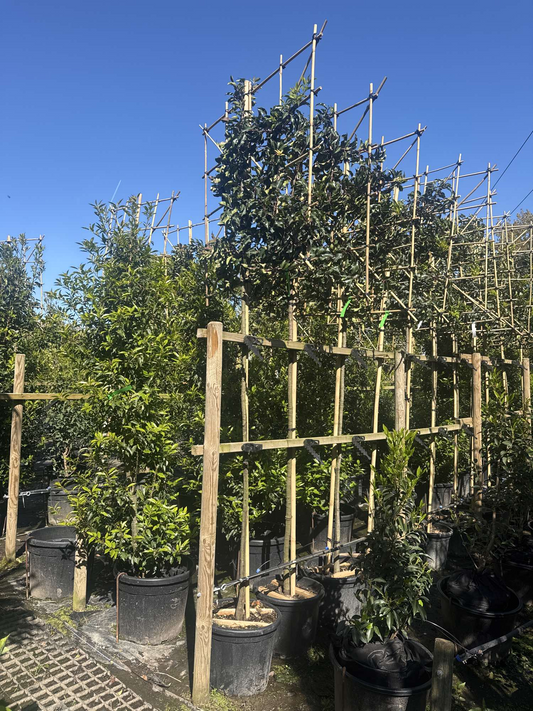
Step 3: Set Up Your Support Structure
Pleached trees need a robust framework to maintain their distinctive flat, layered form. Before summer growth takes off, make sure your support structure is in place.
- Use sturdy timber posts or galvanised steel stakes, set at least 60cm into the ground
- Run horizontal wires or bamboo canes between posts at 30–40cm intervals
- Tie in lateral branches using soft tree ties or horticultural twine — never wire, which can cut into bark
- Check all ties from last year and loosen any that have become tight as stems have thickened
Step 4: Feed for Summer Growth
Late spring is the ideal time to apply fertiliser before the main flush of summer growth. Use a balanced slow-release granular feed (such as Growmore at 70g per m²) worked lightly into the soil around the base of each tree.
For established pleached trees, a liquid feed high in potassium (such as a tomato feed) applied every 2–3 weeks from June onwards will encourage strong, healthy growth and improve disease resistance.
Avoid high-nitrogen feeds after July — these promote soft, leafy growth that is vulnerable to autumn frosts.
Step 5: Mulch Generously
Mulching is one of the single most effective things you can do to prepare your garden for summer. A 5–7cm layer of bark mulch or well-rotted compost applied around the base of each tree will:
- Retain soil moisture during dry summer spells
- Suppress weeds that compete for water and nutrients
- Regulate soil temperature, keeping roots cool in hot weather
- Gradually improve soil structure as it breaks down
Keep mulch clear of the trunk to avoid rot — leave a 10cm gap around the base of each tree.
Step 6: Plan Your Watering
Newly planted pleached trees (planted within the last 12 months) will need regular watering throughout their first summer. In dry spells, water deeply 2–3 times per week rather than little and often — this encourages roots to grow downward in search of moisture, making trees more drought-resilient in the long run.
Established trees are more self-sufficient but will benefit from watering during prolonged dry periods (more than 2–3 weeks without significant rainfall).
Consider installing a drip irrigation system or soaker hose along your pleached row — this is the most efficient way to water and frees up time for other garden tasks.
Step 7: Summer Pruning
Most pleached trees benefit from a light trim in June or July to maintain their shape and encourage bushy, dense growth. Remove any shoots growing outward from the flat plane of the tree, and tie in any new lateral growth to your support framework.
Avoid heavy pruning in summer — save any major structural work for late winter or early spring when the tree is dormant.
Your Summer Garden Checklist
- ✅ Soil improved and pH checked
- ✅ Spacing marked out and planting complete
- ✅ Support structure in place and ties checked
- ✅ Slow-release fertiliser applied
- ✅ Mulch applied around all trees
- ✅ Watering plan in place
- ✅ Summer pruning scheduled for June/July
Ready to Complete Your Garden?
Browse our full range of pleached trees to add structure, privacy, and year-round beauty to your outdoor space this summer: